This is the old blog from Peony and Parakeet.
Welcome to follow the new blog at www.peonyandparakeet.com/blog
This post is also found in the new blog, go to:
http://www.peonyandparakeet.com/how-to-make-your-own-patterned-paper/
While preparing moving to a new house I have tried to avoid big projects. So I have done quite a lot of paper crafting recently. One of the easiest and quickest things to do is to make patterned papers. I use Canson sketch paper (90 g in thickness) and whatever paints and pens I possibly have.

I think that sometimes more really is more, so I call these "More Is More" papers! I am going to use these for my art journal pages. Before cutting them I scan them so that I can use the same paper digitally or print a copy of it. That way I have always some papers available.
Now I am going to show you one of the easiest way I know to make really rich and colorful paper. Besides the paper, you will need watercolors, marker pens, gel pens and colored pencils, correction pen and relaxed mind. Don't worry about the mess you make, it will look lovely in the end!
1) Paint the background with watercolors.
Use circular strokes. Don't think.
Dry the excess water with tissue paper here and there to create some lighter areas.
2) Make doodles with markers.
I love to use PITT artist pens here. Any medium marker will do.
I like circles and swirls but you can doodle what ever comes to your mind. Relax your hand and keep the pressure light.
3) Continue doodling with gel pens.
Now change to gel pens and make detailed doodles. I use Sakura gel pens.
Some might think that this is the last step but no way! More is more, remember!

4) Color areas with colored pencils.
If you look closely there might be areas where colors are grayish or not so prefect. Take your colored pencils and work the problem areas. Do not worry overlapping the doodling. The layered look is just what we aim here.
It looks like this now. Finished? Oh no!

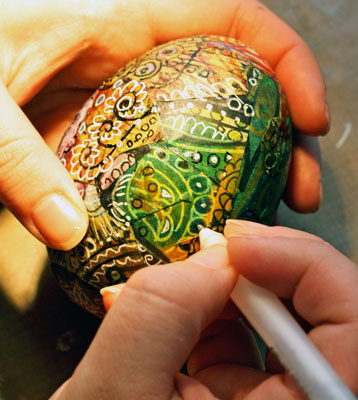
5) Doodle with correction pen.
One of the best pens you can buy is a fine point correction pen. After you have colored all the white areas, you can make the white to come back with the correction pen! Now doodle over the paper, here and there...

6) Add contrast and shine.
Take your black marker and make pretty dots near the white areas.
Optional: If you have a gold metallic pen you can doodle mindlessly over everything to add some extra shine.
Isn't more really more? You can stop in any step, of course, I couldn't!


 After cutting the circles, take the biggest one and draw the shape of the flower with the black marker. I like my flowers to be asymmetrical. I think they look more artsy that way!


